Polaris Slingshot Colorado Driving Laws

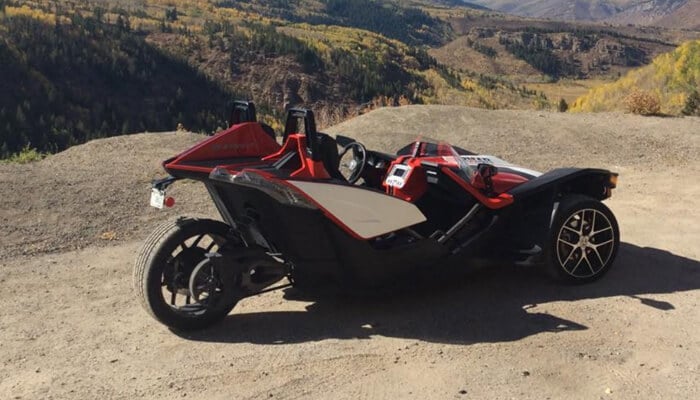
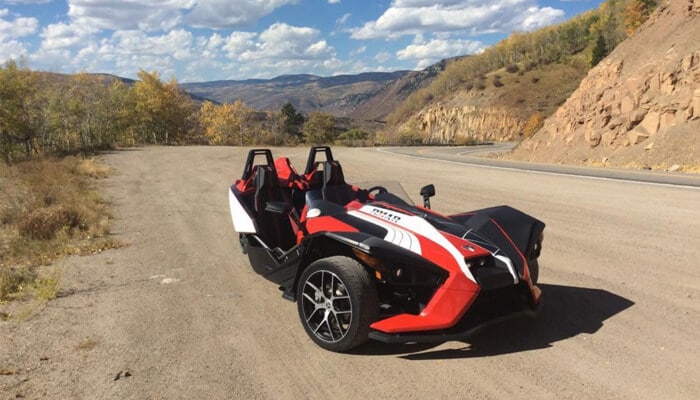
The Polaris Slingshot is sometimes called a three-wheeled motorcycle or a reverse trike, as its design places two wheels up front and one in the rear. Driving a Slingshot is an experience in itself, but driving a Slingshot over the scenic mountain roads near Vail, Colorado, is an unforgettable adventure. Here at Rocky Mountain Adventure Rentals (RMAR), we offer Polaris Slingshot rentals so that you can get the thrill of being behind the wheel in this vehicle that has an incredibly unique design.

Updated Colorado laws make driving the Polaris Slingshot even more accessible, so read on to find out more about the Slingshot driving experience and about where to drive a Slingshot near Vail.

The Polaris Slingshot and Colorado Law

Great news: As of April 2017, Colorado no longer requires a motorcycle endorsement to drive a Slingshot. Now anyone who meets the legal requirements for driving a car can also drive a Slingshot. This change makes Slingshot driving more accessible for a wider group of people who want to give it a try on exciting mountain roads near Vail with Slingshot rentals from RMAR.

A bit of background: When Polaris introduced the Slingshot in 2014, drivers were required to have a motorcycle endorsement or license to operate the Slingshot. Because the Slingshot has three wheels, some states have chosen to continue requiring a motorcycle endorsement. But many states are now choosing to license the Slingshot as a car because it handles more like a car than a motorcycle. Colorado originally required drivers to have a motorcycle endorsement in order to drive a Slingshot, but as of April 2017, Colorado drivers only need a driver’s license to take a Slingshot out on the open road.

In Colorado, drivers and passengers under the age of 18 are still required to wear a helmet when in a Slingshot, in accordance with Colorado’s motorcycle helmet law. Drivers and passengers over the age of 18 are not required to wear helmets when in a Slingshot—though RMAR has helmets available for those who would like to wear them.

The Polaris Slingshot Experience

The Polaris Slingshot is known for its low-to-the-ground ride and for its powerful acceleration. It also features a side-by-side, driver-passenger experience and an open cockpit that doesn’t have any doors. When driving a Slingshot on the mountain passes and rolling terrain near Vail, this set-up lets drivers and passengers take in cinematic mountain views and breathe in refreshing high-country air.

The Polaris Slingshot is also an ace vehicle for driving on winding mountain roads. Because it’s lightweight but doesn’t have overwhelming power, it accelerates nicely through corners and curves. The Slingshot’s body shape gives drivers and passengers the sense of being safe and enclosed while also being incredibly low to the ground.

As Polaris sums up the Slingshot experience

  • Insanely low
  • Absurdly powerful
  • No doors
  • No roof
  • No regrets

Polaris Slingshot Rental and Vail Slingshot Driving

Now that Slingshot driving is even more accessible to Colorado drivers, we’re excited to share the experience by offering Vail Slingshot rentals. It’s possible to drive a Slingshot right out the RMAR adventure rental location in Eagle-Vail, Red Cliff, and Buena Vista and have the day trip of a lifetime.

Ready to go? Find out more here: Slingshot rentals from Rocky Mountain Adventure Rentals. Or give us a call today to reserve: (970) 471-8491.

Drivers must be 16 with approved endorsements. Under 18 must have drivers license present upon rental. Credit Card and Deposit will be taken upon reservation.

2017 Timbersled Snow Bike Race

Timbersled Snow Bike Race

RMAR Tops Timbersled Snow Bike Race at Sledstock 2017

Rocky Mountain Adventure Rentals (RMAR) rider Matt Wohlgemuth took first place overall in the Sledstock 2017 cross-country snow bike race held at Rabbit Ears Pass, located in Colorado between Kremmling and Steamboat Springs on April 1, 2017. Other RMAR riders also had a strong showing, including two female riders who raced with the field for the first time. The snow biking race was a part of the larger Sledstock 2017 at Rabbit Ears Pass event, which included a pro snowmobile race as well as semi-pro, snow bike, vintage, and kids classes. Organized by Mountain States Snowmobile Racing with the support of local sponsors, Sledstock 2017 at Rabbit Ears Pass also featured live music, DJs, and after parties for a festive event held under classic Colorado blue skies.

The Sledstock 2017 at Rabbit Ears Pass snow biking race is believed to be the second-ever organized cross-country race held for the sport of snow biking, also called Timbersledding. The 19-mile loop course covered varied terrain, from snow-covered jeep roads and singletrack to dense pine forests and a wide-open section of motocross-like track that included jumps and natural snowdrifts. Constantly changing terrain added to the challenging and adventurous nature of this course with snowed-in creek crossings and winding, alpine-meadow descents. Riders completed two laps on the loop for a 38-mile race distance.

RMAR rider Matt Wohlgemuth won first place in the cross-country snow bike racing event, beating out pro snowmobile racer Wes Selby, who went on to compete in and win the pro snowmobile race later in the day. Other RMAR racers had a strong presence in the field, including Spencer Brown, Stanton Morris, Nathan Finneman, Dick Payton, Clay Bidwell, and female racers Nikki Sjoden and Sasha Eagen, who are believed to be the first women to race in a Timbersled series.

With a field of 15 riders, the 2017 Sledstock Rabbit Ears Pass snow biking race showed a positive increase in snow bike racing interest and attracted a high caliber of riders in this sport that is beginning to take off in Colorado. Mountain States Snowmobile Racing will be teaming up with Steamboat Powersports in the 2017-2018 winter season to organize a highly anticipated series of seven snow bike racing events in Colorado.

Snow biking and snow bike racing are relatively new sports, and RMAR is pioneering snow bike riding and racing in Colorado while also giving others the opportunity to try it out with Timbersled rentals available from its rental outlet near Vail, Colorado. Snow biking is also called Timbersledding, and the machines themselves are sometimes called snow motorcycles, snowtercycles, or snow dirt bikes. Timbersled is the brand name for a snow bike conversion system that allows dirt bikes to be converted into snow bikes for winter riding on various snow-covered terrain. The Timbersled system results in the creation of a snow bike that has the terrain capabilities of a snowmobile but with the agility of a dirt bike.

Snow biking naturally appeals to dirt bike and snowmobile enthusiasts, but it’s also attracting a wide range of athletes and recreational riders looking to experience the backcountry in a new way during the winter season.

As forerunners in snow bike racing and in Timbersled rentals and maintenance, Rocky Mountain Adventure Rentals is the leader in Colorado’s growing Timbersled rental market. For the 2017-2018 season, RMAR will be renting snow bikes equipped with Timbersled’s new ARO 120 kit that has a redesigned front ski and spindle, making it more lightweight and easier for beginners to ride.

All RMAR Timbersled rentals go out with a fully assembled Timbersled snow bike, a helmet, and a trailer and hitch, if needed. For an additional fee, pants, boots, avalanche gear, goggles, and trail maps are available, but expert advice and depth of local knowledge remains free when renting from RMAR’s staff of pioneers in Colorado’s Timbersled industry.

Paddle Boarding Colorado

Whether you’re a first-timer or an expert at stand up paddle boarding (SUP), you’ll want to try out this growing water sport here in Vail, Colorado, where mountain peaks and scenic vistas inspire any adventure. The Vail area is unique for stand up paddle boarding because it offers opportunities for relaxing lake floats and for exciting river paddling.

Stand Up Paddle Boarding Gear & Overview

Stand up paddle boarding is continuing to gain popularity with fitness enthusiasts who want a full-body workout—and with those who just want to enjoy this sport at a recreational level. A strong core is essential for optimal paddling, and stand up paddle boarding challenges strength and endurance. Yoga can also be done on a stand up paddle board to add an additional layer of challenge to traditional land-based flexibility and balance training. Plus, stand up paddle boarding is simply fun, and it can be a social activity when shared with family or friends.  

Minimal gear is required when stand up paddle boarding, which adds to its appeal. In order to go out on a lake or river, you’ll need a paddle board, a paddle, a PFD (personal floatation device), and a leash, which helps keep your board nearby in case you fall off. Different types of leashes are used depending on water type—still water versus whitewater—and it’s important to understand how leashes work in order to avoid potential dangers. SUP clothing depends on activity type and water type. On a warm summer day, for example, swimsuits can be worn while out on a lake, but if you’re stand up paddle boarding down a river in snowmelt whitewater, you’ll want to wear a wetsuit or a full dry suit. 

Where to Paddle Board near Vail Colorado:

Nottingham Lake:

This small lake in Avon is perfect for SUP beginners.

https://rmar1.com/map_geometry/paddle-board-nottingham-lake/

Lake Dillon / Dillon Reservoir:

Enjoy mountain views, and get a great workout while paddling along the generous shoreline of Lake Dillon.

https://rmar1.com/map_geometry/lake-dillon/

Wolford Reservoir:

This quiet reservoir north of Kremmling gives you a lot of space to SUP and explore.

https://rmar1.com/map_geometry/wolford-reservoir/

Rancho del Rio to State Bridge:

Gain some SUP lake experience, and then try out this four miles of mellow river fun on the Upper Colorado River.

https://rmar1.com/map_geometry/rancho-to-statebridge/

Pumphouse to Rancho del Rio:

This stretch of the Upper Colorado River is recommended only for highly skilled and experienced stand up paddle boarders, and it’s also very popular for other water sports.

https://rmar1.com/map_geometry/upper-colorado-river/

Ready to go stand up paddle boarding? Find out more here: Stand up paddle board rentals from Rocky Mountain Adventure Rentals. Or give us a call today to reserve: (970) 471-8491.

https://rmar1.com/sup-board-rentals/

LNT Principles: Leave No Trace

Stay the trail. Don't bring glass. Pack it out.

Leave No Trace

The LNT Principles are a relatively simple set of rules to follow while in the backcountry whether you are on BLM land, National Forest, or even somewhere outside of the United States. If all outdoor enthusiasts would follow these simple guidelines, many of the once-open lands would still be open – instead of our current situation where lands are continually being closed off. At Rocky Mountain Adventure Rentals, we take pride in allowing visitors the opportunity to access areas that they would not otherwise be able to access without our equipment. Not everyone is capable of hiking deep into the woods – whether it has to do with physical fitness, age, disabilities or other obstacles. Having the opportunity to jump in a side-by-side RZR with the family and ride to the top of a mountain is more often than not a gift. If everyone, motorized and non-motorized adventurers would simply follow the rules of Leave No Trace, we will all be able to help protect our lands for future use.

Below you will find the 7 basic concepts of LNT Principles – Leave No Trace. We recommend that you take the time to set these to memory and follow the principles the next time you find yourself in the wilderness.

#1. Always be Prepared and Plan Ahead.

  • Research and educate yourself on the regulations of the area you plan to visit.
  • Be prepared for all conditions including: weather, hazards and emergencies.
  • Schedule your trip around times of high use – try to avoid over population of one area.
  • Travel in small groups.
  • Repackage food and supplies to minimize waste.
  • Use a map and compass. Avoid having to use marking paint, rock cairns or flagging.
  • Always let others know where and when you plan to be visiting a location.

#2. Travel and Camp on Designated and Durable Surfaces.

  • Designated and Durable surfaces include marked trails, campsites, rock, gravel, dry grasses, and snow. UTV, ATV’s, Dirt Bikes – You must STAY on trails. NEVER drive off of the marked trail/path.
  • Always camp at least 200 feet from lakes, rivers and streams.
  • Concentrate on using existing trails and campsites – avoid places where new impacts are beginning.
  • Always walk single file in the middle of the trail – no matter the conditions.
  • Keep campsites small.

#3. Dispose of Waste – Properly.

  • Pack it in, pack it out. Thoroughly inspect your campsite and rest areas for trash and other items including spilled foods. Pack out all of your trash, leftover food and litter. This is the most common of all broken rules.
  • Deposit solid human waste in foxholes. Your foxhole should be 6 to 8 inches deep and at least 200 feet from water, campsites and trails. Cover the foxhole when finished.
  • Always pack out toilet paper and all hygiene products.
  • To wash yourself or your dishes, carry water 200 feet away from rivers, streams and lakes. Use biodegradable soap in small amounts.

#4. Leave it Alone.

  • Preserve the past: look and inspect, but do not touch cultural or historic structures and artifacts.
  • Don’t pick the flowers. Leave rocks, plants and other natural objects alone.
  • Avoid introducing or transporting non-native species.
  • Do not build structures or dig trenches.

#5. Minimize Campfire Impacts.

  • When and where fires are permitted, use already established fire rings.
  • Keep fires small. Only use sticks from the ground that can be broken by hand.
  • Burn all wood and coals to ash and put out campfires completely. Do not leave a campfire that is still smoldering.
  • Use a small camp stove for cooking to avoid added need for a fire.

#6. Respect Wildlife- Leave the wildlife alone.

  • Do not follow approach the wildlife and only view the wildlife from a distance.
  • Do not feed the wildlife. 
  • Control your own pets at all times.
  • Avoid wildlife during times of mating, nesting, and other sensitive times.

#7. Be considerate of others.

  • Be courteous. Yield to uphill traffic on the trail.
  • When encountering horses and other pack stock, step to the downhill side of the trail.
  • Camp away from trails and other trekkers.
  • Speak softly to avoid creating loud noises.

Vail Colorado Weather

Your local forecaster is wrong... about Colorado weather

Vail Colorado weather snow conditions

Years ago I was delivering some product to a client in Vail Village. It was two days before the opening weekend which for Vail Mountain is always around Thanksgiving. The ski patrol had already posted the runs that would be available for opening day. Per usual, it was just the front side of the mountain that was set to open. Meanwhile, a few feet next to me there was a young man in his early teens standing next to his younger brother. While looking at the large trail map that was mounted on the wall, the younger of the two was pointing out all of the runs he was hoping to ski. In a fit of rage, the older brother threw his arms in the air, tossed out a few choice words and finished by saying “None of those runs are open. They are never open. Every year we come here, they are never open.”

Now you can understand the young mans’ frustration. He most likely traveled a long way with the hopes of skiing the back bowls of Vail in untracked powder. To make matters worse, when the young man looks up on the mountain, he can clearly see that all of the peaks are covered in snow. However, when he reviews the map, he learns that those same runs that are covered in snow will not actually be opening.

You can’t blame the kid for his frustration. You also can’t blame Vail Resorts. Vail Resorts has a responsibility to their guests to provide a safe environment and when it comes to early season snowfall, many times, it takes a while for the snow to settle and form a safe base to ski on. That is a battle that Vail Resorts and all winter-based companies here in the mountains deal with. Even here at Rocky Mountain Adventure Rentals, we need to perform early season snow depth checks to make sure the regions are ready to ride. It is the reality of the early season.

Early season snow conditions only represent one of the many challenges that local mountain businesses have to navigate in order to have a successful winter season.

One of the larger challenges is dealing with the professional guessers of the world who call themselves “Weather Forecasters” or “meteorologist.” They are much like Punxsutawney Phil but without the pizzazz and fanfare. Now I’m probably being a little too harsh and maybe a bit childish in my name calling but I felt it was the best way to vent my frustrations with the industry as a whole.

There is a national lack of understanding when it comes to the Colorado Rocky Mountains and the weather patterns of the state of Colorado as a whole. I myself, who is originally from the Detroit area, used to believe that Denver was a cold city and that Denver represented the majority of Colorado. After all, Denver is the most widely known city in the state and the state itself is known for alpine skiing. I moved to the central mountains back in ’98 and have since learned that the direct opposite is true when it comes to weather and temperature. Denver is a very warm, high desert climate and the weather of Denver very rarely represents the Colorado Rocky Mountains. Often times, when Denver is experiencing a warm period in the middle of winter, it is still very much in fact, a winter wonderland here in the mountains. To that point, Denver is currently seeing temperatures in the mid 70’s and yet here in the high country, our snowpack is at 118-124%. Unfortunately, the local weather forecasters around the country feel it necessary to shout to the world that “Colorado” is seeing unseasonably warm temperatures which creates an uphill battle for all of us local businesses that depend on the winter travelers.

When the forecasters of the world lump the entire state of Colorado in with Denver’s weather pattern, you can literally see online searchers and bookings drop severely. Vail Resorts is often times the most susceptible to this penalty but even the local, small businesses feel the pain. What makes the matter even more difficult is that at a micro level, even the mountain towns see warm weather during the winter months that do not reflect the snow on the hill. Here in the Vail Valley, many locals choose to live in Edwards, Colorado because of the “Banana Belt” as it’s called. The belt is a strange occurrence where the western canyon causes a split in the weather pattern. Edwards will stay sunny and warm while the mountains to the north and south stay covered in snow. Even as I write this article, I am sitting in shorts and a T-shirt while watching my neighbors heading out to go cross-country skiing.

To even further complicate the forecast, the mountains can create their own weather pattern and their own precipitation – known as the Orographic Lifting. Orographic lifting refers to the changes in air flow when the topography of the land forces the air up a mountain. When the weather system moves across the land, it has no choice but to follow the topography of the land below it; air must go over mountains and through the valleys. As elevation changes with terrain, the pressure and temperature of the weather system change as well. All of this combined can cause the Mountains to create their own weather system and precipitation.

We recently had a family call us from South Carolina concerned about their travel plans. After hearing their local weathermen speak of the unseasonably warm temperatures in “Colorado” they began to question their own vacation plans. Thankfully, they had the foresight to call us and confirm whether or not the reports were true. We were able to quickly explain what the snow conditions were versus the in-town temperatures.  They made the trip out and at the end of their stay, they thanked us because they had the time of their life being able to ski and snowmobile in great snow conditions while enjoying the warmer temperatures in town.

Small businesses can’t afford to mislead people here in the mountains; we are too dependent on loyal customers. If you do plan on coming to Colorado to enjoy the snow, please do not put your travel plans in the hands of a weather forecaster in Toledo. Simply call the local shop that you plan on visiting or at the very least visit the Rocky Mountain Adventure Rentals Snow Report which displays the base depths of all of the Colorado snow basins. You can also visit sites such as snotel which are more scientific in their approach and unlike local weathermen, snotel is not trying to create a story out of nothing.

You worked hard for your vacation, don’t let it pass you by because of an irresponsible forecaster who didn’t take the time to research the difference between Denver and the state of Colorado. Many forecasters’ around the country fail to even recognize that the snowiest months in Colorado are actually in March and April.

I write this piece on behalf of all local mountain businesses here in the great state of Colorado. It’s a topic that has been bothering me for years and I felt now was the time to put those thoughts to paper due to the increase in faulty reports nationwide.

What is Altitude Sickness

Dr. Lindsey Nelson explains.

Altitude sickness

—also known as acute mountain sickness (AMS), is a medical problem when we are exposed to high altitude low partial pressure of oxygen usually following a rapid ascent to an elevation above 8,000ft  (82400m).   Common symptoms of altitude sickness resemble the ordinary flu or feeling “hung-over”.   Therefore, people with AMS frequently complain of headache, fatigue, upset stomach, dizziness, and restless sleep.  Furthermore, it is hard to determine who will be affected by altitude sickness, as there are no specific factors that correlate with a susceptibility to AMS.    Anyone who travels to altitudes of over 2500m or 8,000ft is at risk of acute mountain sickness. Normally it doesn’t become noticeable until you have been at that altitude for a few hours. Part of the mystery of acute mountain sickness is that it is difficult to predict who will be affected. It is not uncommon to hear stories of young athletic individuals being badly limited by symptoms of AMS while older members doing the same activity have felt fine.   Do NOT be fooled by AMS or take it lightly. The dangers of this illness can be severe and every year people die of this physiological derangement when left unrecognized and untreated as AMS can progress to the potentially fatal high altitude pulmonary edema (HAPE) or high altitude cerebral edema (HACE).


What causes altitude sickness?

Two things are certain to make altitude sickness very likely – ascending faster than 500m per day, and exercising vigorously.   This includes the many people that come to Colorado on vacation to enjoy our outdoor activities.   Utilizing one of the outdoor “toys” at Rocky Mountain Adventure Rentals, LLC will potentially allow you a quicker ascent than was possible before.  REMEMBER: Physically fit individuals are not protected – even Olympic athletes get altitude sickness. Altitude sickness happens because there is less oxygen in the air that you breathe at high altitudes.  As you may have noticed, you may feel more parched at our altitude so it is also likely, that dehydration due to the higher rate of water vapor loss at higher altitudes may contribute to the symptoms of AMS.

The AAAs that influence AMS susceptibility

  • Ascent Rate
  • Altitude Attained
  • Activity Amount

The Three Forms of Altitude Sickness

Acute Mountain Sickness (AMS)

Mild altitude sickness is called acute mountain sickness (AMS) and is quite similar to a hangover – it causes headache, nausea, and fatigue. This is very common: some people are only slightly affected, others feel awful. However, if you have AMS, you should take this as a warning sign that you are at risk of the serious forms of altitude sickness: HAPE and HACE. Both HAPE and HACE can be fatal within hours.

  • Lack of appetite, nausea, or vomiting
  • Fatigueor weakness
  • Dizzinessor lightheadedness
  • Peripheral edema(swelling of hands, feet, and face)
  • Insomnia
  • Pins and needles
  • Shortness of breath upon exertion
  • Nosebleed
  • Persistent rapid pulse
  • Drowsiness
  • Excessive flatulation
  • General malaise

HAPE

HAPE is excess fluid on the lungs, and causes breathlessness. It is similar to when people with heart disease are in failure and have pulmonary edema.  It is NEVERnormal to feel breathless when you are resting – even on the summit of Everest. This should be taken as a sign that you have HAPE and may die soon. HAPE can also cause a fever (a high temperature) and coughing up frothy spit. HAPE and HACE often occur together.   DESCEND IMMEDIATELY!!

Pulmonary edema (fluid in the lungs)

  • Symptoms similar to bronchitis
  • Persistent dry cough
  • Fever
  • Shortness of breath even when resting

HACE

HACE is fluid on the brain. It causes confusion, clumsiness, and stumbling. The first signs may be uncharacteristic behavior such as laziness, excessive emotion or violence. Drowsiness and loss of consciousness occur shortly before death.  DESCEND IMMEDIATELY!!

Cerebral edema (swelling of the brain)

  • Headache that does not respond to analgesics
  • Unsteady gait
  • Gradual loss of consciousness
  • Increased nausea and vomiting
  • Retinal hemorrhage

Altitude sickness prevention

The body has an amazing ability to acclimatize to altitude, but it needs time. Ascending slowly is the best way to avoid altitude sickness. Avoiding strenuous activity such as skiing, hiking, etc. in the first 24 hours at high altitude reduces the symptoms of AMS.   AVOID alcohol and sleeping pills as they are respiratory depressants, and effectively slow down the acclimatization process and should be avoided. Alcohol also tends to cause dehydration and exacerbates AMS. Thus, avoiding alcohol consumption in the first 24–48 hours at a higher altitude is optimal.


Increased water intake may also help in acclimatization to replace the fluids lost through heavier breathing in the thin, dry air found at altitude, although consuming excessive quantities (“over-hydration”) has no benefits and may cause dangerous hyponatremia.


Can I take drugs to prevent altitude sickness?

As with everything, many ‘quack’ treatments and untested herbal remedies are claimed to prevent mountain sickness. These treatments can make AMS worse or have other dangerous side effects – many herbs are poisonous. Only one drug is currently known to prevent AMS and to be safe for this purpose: acetazolamide (diamox). The Centers for Disease Control and Prevention (CDC) suggest the same dose for prevention of 125 mg acetazolamide every 12 hours. Acetazolamide, a mild diuretic, works by acidifying the blood. This change in pH stimulates the respiratory center to increase the depth and frequency of respiration, thus speeding the natural acclimatization process. An undesirable side-effect of acetazolamide is a reduction in endurance performance. Other minor side effects include a tingle-sensation in hands and feet, and it can make carbonated drinks taste “flat”. Although a sulfonamide, acetazolamide is a non-antibiotic and has not been shown to cause life-threatening allergic cross-reactivity in those with a self-reported sulfa allergy.  This drug should only be taken at the direction of your primary care physician.


Prior to the onset of altitude sickness, ibuprofen is a non-steroidal anti-inflammatory that may help reduce the headache and nausea associated with AMS.

Author: Dr. Lindsey Nelson

Whitewater Rapid Classifications

It’s almost impossible to predict what to expect on a river. It’s a living, moving, and ever changing body of water. To help you prepare for a day on the river, there have been certain rapid classifications set-up to help you better understand what to expect for specific sections of river. Though not an exact science, Whitewater Rapid Classifications are set between Class I and Class VI. We have assembled this list to help you understand how River Rapids are Classed and Characterized. Always keep in mind that the rapid classes are often times left for debate as to whether or not a particular rapid is actually a class ll or say a class lll – it is often times up to the paddler(s) to decide what the class is based on their own level of skill. For this reason, the Whitewater Rapid Classifications are really more of a guide and they are used to represent how difficult the rapid is to navigate – not how much fun the rapid is.

Class I Rapids

Class I Rapids include fast moving water with ripples and small waves. Their are few obstructions, which are for the most part obvious and can be easily avoided with basic training and knowledge. The risk to swimmers is marginal and self-rescue is fairly easy.

Class II Rapids

The class II rapids are usually wide and clear with channels that are evident without scouting. Maneuvering maybe required but to a trained paddler, rocks and waves should be easily missed. Rapids that are borderline in this class are often referred to as “Class II+” and swimmers are rarely injured and group assistance is rarely needed.

Class III Rapids

Class III Rapids are moderate with irregular waves which can be difficult to avoid and can swamp an open canoe, kayak and/or Ducky. Good boat control in tight passages or around ledges is often required and large waves or strainers may be present but should be easily avoided. Eddies and powerful current effects can be found most commonly on large-volume rivers. Inexperienced parties should always scout the river before taking on the rapids. Injuries are often rare while swimming but having group assistance might be required to avoid long swims. Class III- and Class III+ labels are often times given to rapids that are on the lower or higher side of difficulties within the “Class III” rapids.

Class IV Rapids

Both intense and powerful rapids that require precise boat handling. Depending on the river, the rapids may include large and unavoidable waves, holes, or constricted passages which require quick thinking and maneuvers under pressure. A fast, reliable eddy turn may be a needed skill to initiate maneuvers, scout rapids, or rest. Some rapids may include “required” moves above dangerous hazards. Scouting recommended for the first time down. Swimmers will experience a moderate to high risk of injury and water conditions could make self-rescue impossible. Group rescue is preferred, if not essential, and requires an experienced set of skills. Having a solid eskimo roll is highly recommended. Class IV- and Class IV+ labels are given to rapids that are on the lower or higher side of difficulties within the “Class IV” rapids.

Class V Rapids

These rapids can be extremely long, obstructed and very often times violent and leave the paddler exposed to risk. Drops most likely contain large, unavoidable waves and holes or steep chutes with complex, demanding routes. Class V rapids will continue for long distances between pools which demands experience and core fitness. Few eddies will exist and most likely will be small, turbulent, and difficult to reach. Scouting is essential and can often times be difficult. DON’T Swim, but if you do, swims will be dangerous and rescue is usually difficult even for trained and experienced experts. You must have a very strong and reliable eskimo roll, proper equipment, extensive experience and appropriate rescue skills. Their is a large range of difficulty that exists beyond Class IV and Class V is a multiple-level scale designated by class 5.0, 5.1, 5.2, and so on.  Each level is an order of magnitude more difficult than the last. Example: going from a Class IV to a Class V is the equivalent of going from a class 5.0 to a 5.1.

Class VI Rapids

These are impossible and mostly left to the crazies who have a death wish. In fact, the overwhelming majority of these rapids have never been attempted and they exemplify the extremes of river difficulty, unpredictability and danger. Errors are very severe and rescue is probably impossible. These rapids are left to teams of experts/professionals at favorable water levels. Upon proper inspection and taking all necessary precautions professional teams will run these rapids many times over and upon relative continued success, the rapids will be re-classed to the appropriate rating if changed at all.

Tagert Hut Review: Winter

Tagert Hut Review: Winter

A portion of the RMAR team set out on an expedition to the Tagert Hut as a way to ring in the 2016 New Year. If the idea of a “Hut Trip” is new to you, you should know that “Hut Trips” are the types of trips that people come out of the woodworks for. They are the epitome of what a true Colorado Adventure can and should be. You plan your food rations well in advance, you pack for all types of weather conditions, you carefully consider what you need to bring vs what you want to bring while keeping a watchful eye on the weight of your pack. You will question your physical conditioning every waking hour leading up to the trip and you will constantly debate whether or not to snowshoe in or use your AT or XC set-up. You will find yourself researching new avalanche equipment, GPS equipment, and you may even find yourself researching and purchasing a handful of new maps. You will do all of this for what will in the end be nothing more than a quick 24 hour out and back expedition…. Unless you’re setting off on a true hut-to-hut trip.

Having sleep accommodation’s for 6 (or a very cozy 7), The Tagert Hut is one of the smaller huts in the Braun Hut System. It is located south of Aspen on Montezuma Road (Pearl Pass) and is just 20 yards away from the Green-Wilson Hut. In the summer time, you can park right at the trail head if you are choosing to hike to the hut but in the winter, the main road is closed about 2 miles from the actual trail head. In the winter months it is about a 7 mile jaunt from the winter parking location to the front door of the hut. The majority of the hike is on a consistent grade and really isn’t too bad by most standards here in the high country. Where the trip becomes a little more difficult is after you cross the bridge leading into the switchbacks. At this point, you are only about ¾ of a mile away from the hut but the pitch is enough to make you want to turn back and go home. In the winter, we found that the trail is basically hard packed until you reach the switchbacks. A few of us didn’t even wear our snowshoes until we reached the switchbacks because the trail was so packed down from day use. At the end of the day, it took our slowest group member about 4 hours to make it to the hut and that included many breaks for photos, lunch, and even a long chat with a local from Aspen who was taking his fat tire snow bike for a day ride.

One of the more surprising items to note is that the trail really is not as exposed as other reports claim it to be. We were expecting to be in extreme avalanche country the entire way based on what others had written but in reality, there are really only 4-5 big areas to look out for and they are up towards the top of the hike. Most of the trip included very large, steep mountains on both sides of the trail with very obvious avalanche chute outcroppings but the chances of the slides making their way to you while on the trail would seem unlikely as they would have to cross a very deep river basin first. However, that being said, as you get closer to the top, there are a few spots where you need to pay attention to your surroundings because you will be crossing some very exposed areas. So, the danger is there but it is not the entire way – maybe a just half of the way.

The Tagert Hut being smaller than most, it did not offer the super cool wood burning cooking stoves that you find at Jackal Hut and others but what the hut lacked in creature comforts, it made up for in sound construction. The Tagert hut is probably the best hut I have ever experienced when it comes to insulation – there was not one draft coming into that building. In fact, just after dinner, we had to kill the wood stove. It was just too hot inside. We didn’t relight the woodstove until the morning and it was mainly to help prep the cabin for the next guest. Speaking of dinner, We pre-made a Brunswick Stew and vacuumed sealed individual rations. It made for easy clean-up which is important on a guys trip. We also made Jell-O Shots and shared them with the group that was over at the Green-Wilson Hut. For breakfast we had pre-made Scottish eggs with gravy.

Normally when I participate in hut trips, I try to keep the group together and work as team for safety reasons while ascending/descending on the trail. In the case of this trip, the weather and snow conditions were so perfect that the descent became more of a free-for-all. Some of us left on downhill skis and others went at their own pace on their cross-country set-ups and a few of us slowly meandered our way down on our snowshoes. It took about 1 hour for the slowest person in our group to make it back down to the car.

For being the first hut trip of the season for us, I thought the trip to Tagert Hut was a success. We got lucky on weather and avalanche conditions. Even though each of us had a shovel, probe, and transceiver, I question how truly ready were to use them. If you’re going to Tagert in the winter months, I would also warn you that the propane line that is feeding the table top stove is a little finicky when the temperature drops below 15. If you would like to see a detailed map of the route we took, please visit our Colorado map and find “Tagert Hut” under the Trails Menu. Trails > Huts > Tagert Hut.

tagert-hut-winter-rmar1-2016
tagert-hut-winter-rmar1-2016-aspen
tagert-hut-winter-rmar1-2016-entrance
tagert-hut-winter-rmar1-2016-exterior
tagert-hut-winter-rmar1-2016-pearl-pass
tagert-hut-winter-rmar1-2016-scenic

Top 3 places to ride Snowmobiles and Timbersleds in 2016

Top 3 places to ride Snowmobiles and Timbersleds in 2016.

Wondering where to go ride in Colorado? We already know that on New Years Day any place with the name “Vail” in the title is going to be super busy and this includes Vail Pass Colorado. So where can you go with your Snowmobiles and Snow Bikes (Timbersleds) to avoid the heavy crowds on New Years Day and throughout the 2016 winter season? After careful consideration, we have compiled a list from our own experiences over the past 15 years.

#1. Sylvan Lakes Colorado

Located just west of Vail and South East of Eagle and known as a popular summer destination for paddle boarders, campers, and travelers looking to take the back roads to Aspen, the Sylvan Lake Region offers enough open space to keep you exploring for days. Most of the area is comprised of rolling hills, thick forest, and high alpine terrain with a few steep pitches to be weary of. There is even a canyon of sorts that cuts through the middle. The region is a popular destination for a few local riders but is far enough away from the front range of Colorado to keep the masses from charging the snow in full force.  One disadvantage of the Sylvan Lakes Region is its distance from any gas or service stations. Those of you on TImbersleds will want to top off your spare tank before heading out and for those of you with snowmobiles, you will want to have a spare can in your truck. The town of Eagle is known for having the worst cell phone and internet coverage in Eagle County and by the time you reach your destination at Sylvan Lake, you will be officially off-the-grid so plan accordingly with GPS devices, maps and always let others know that you will be in the area and when.

#2. Montezuma Colorado

You can’t go wrong with Montezuma. Though it is a small open space to ride through, it just isn’t on most people’s radar. Lets face it, if you’re from the front range of Colorado and spent a few hours in skier traffic, you’re probably not willing to make the U-turn off the highway to double-back through Keystone and up to Montezuma – you most likely already have your plans in place for either Vail Pass or Rabbit Ears Pass. For those of you in Vail, it may just look like too far of a drive and why would you take an extra hour to get there when you can just pull off on the pass? Well, it’s for those two reasons that make Montezuma one of my top choices. Much like Sylvan Lakes, it stays relatively quiet no matter the time of season. The one down side is that even though the area is big in terms of square acres, the available space to ride is really only enough to keep you occupied for about a day. Most of the riding is through narrow valleys and the mountain peaks are too steep to climb which can also make the region a high avalanche risk so you must check the conditions before heading out. Just like the Sylvan Lake Region you will be completely off-the-grid by the time you pass Keystone and your last chance for gas is in the town of Keystone. There used to be a general store in Montezuma where you could purchase food rations and fuel but we’re sorry to say that the shop closed down a few years ago.  As for scenery, you really can’t beat having two of Colorado’s most popular 14ers (Grays and Torrey’s) as your backdrop.

#3. South Glenwood Springs

I actually discovered this area on a cross country skiing trip. We were spending the day up behind Ski Sunlight and in the distance I could hear the sounds of Braap Braaaap Braaaaaap. Once I returned home I immediately looked at the White River National Forest Open Space Map and sure enough the region is designated for recreational motor vehicle use. It’s an open and relatively flat area of land which is great for those of you heading out on a snow bike (timbersled) for the first time or for those of you who really want a chance to open up the throttle on an RMK800. The hardest part about the region is just getting to it. Navigating the slow roads of Glenwood Springs you need to get on 4 Mile Road (117) at the south end of town. If you miss the cut-off you will have to circle back in often times heavy Pitkin County traffic. Once you get on 4 Mile Road you just need to pay attention as there is a split right before Ski Sunlight. Take the split and you will loop around the ski area on the north side. As you head up the road you will see people parked along the road. DO NOT park too early on the road – the designated open space does not begin until you reach the main parking area a few miles up. The parked cars you see early on are either out cross country skiing or breaking the forest rules thereby eventually ruining it for the rest of us. Please always follow the forest service guidelines so we can keep our open spaces, open. Once you find the main entrance, you will see powder fields in every direction. Again, you will be off-the-grid at this point so have a map ready but you will quickly learn why this location is worth the drive.

If you’re looking to head out into any of these regions, be sure to give us a call so that we can get you set up with your equipment early in the morning thereby giving you plenty of time to get to your chosen location. If you are going to any of these regions, or heck, any region at all in Colorado, we highly recommend that you bring proper avalanche safety gear, extra fuel, food, water, maps, and proper attire – always avoid cotton.

Braaaaaaapy 2016 everyone and we look forward to seeing you out in the snow.

Snowmobiling in Powder: How to Guide

Snowmobiling through powder for the first time can be frustrating

This article is meant to serve up some “basic techniques” to start with. We will continue to follow up with more instructional videos and information in time to help you advance your riding level. We hope that for the novice and even some intermediates that this essential list will help make your first days of snowmobiling in powder more enjoyable.

#1: Always be prepared:

We’re talking bomber proof gloves, jackets and other articles of clothing. Act as if you are heading into the artic so dress accordingly. Klim makes incredible gear to keep you dry and riding all day. Make sure to dress in layers, avoiding cotton, especially on your feet. Water wicking synthetics are your best choice for base layers. Always, we mean ALWAYS carry avalanche equipment (Beacons, probes, shovels) and know how to use them – it may surprise you how many folks own a beacon but do not actually know how to use it.

#2: Stopping:

Have you ever sunk your sled in the snow or witnessed others trying to yank their sled out of hole? It’s an awful experience and can be easily avoided by simply remembering to always stop on a pre-existing track or area of hard pack. If you happen to be the lucky one who gets to shoot off into an untouched powder field first, just remember to circle back onto your own track if you need to stop.  Also avoid inclines but if you must stop on an incline, point your motor downhill as it will make it easier for you to get going again.

#3. Go Fast! or not… :

With ever changing snow conditions you must practice good throttle control techniques. While out riding, play around with the throttle on your machine and take note of the subtle movements that the sled makes when you throttle back vs throttling hard and trenching. Sometimes, if you’re throttling hard and the sled begins to sink you can back off the throttle and the snowmobile will begin to resurface. When this happens, you can then hit the throttle again and move along.

#4: An object in motion, stays in motion:

The Laws of Physics play a major role in snowmobile powder riding. The key is to keep your snowmobile moving through the snow. In order to do this, you must always pick your lines (mind your surroundings, Batman). Pick your lines through obstacles before you reach them; keep your head up and always look ahead of your snowmobile.

#5: Don’t sit down:

Sitting is the one position that you should NEVER EVER do while riding through deep powder. Always stand or kneel on your sled and adjusting your handle bars, brake and throttle positions will allow you to do just that. Unlike cruising through the hard pack trails of the Midwest, Snowmobiling in deep Colorado powder requires an active riding stance where the rider must transfer weight from side-to-side. This allows the rider to control the sled while turning through deep pockets of snow – a feat which is deemed impossible while sitting.

#6: Be self aware:

When you first get out into the back country, you will see more experienced riders taking the steep and deep routes. Sure it looks amazing but be mindful of your current skills. If you get over amped to go big, you may find yourself in an endless game of “drag the sled out of tree well.” A 3-hour tour into the back country can turn into the winter’s version of Gilligan’s island if you try to push yourself past your level of skill too quickly.

#6: Aannnd you’re stuck:

At some point in time, you will get stuck. In fact, even the best riders will find themselves stuck from time-to-time. It’s just a part of the sport and so it makes sense to have some knowledge as to how best to deal with the situation. Unless you’re an ex-linebacker from a D1 School, you probably cannot lift your 500lb machine so stop trying to lift the machine out of the hole. Remember what we said about stopping on packed snow? The same rule applies to getting unstuck. Take a few minutes and stomp down some snow with your feet. Using your legs and feet, move the snow from under the front of your sled. Once the snow is cleared, create an exit track by creating a small pathway in the snow – just walk through the snow. You just need a track that will allow the sled to climb out of the hole that it is in. Once the track is set, give the machine some gas and you’re back out on top. Watch our step-by-step demonstration video below on getting unstuck in a snowmobile.

Again, this is a short list in what we hope to be an on-going series on best practices and techniques for Snowmobile riding in deep powder. Please check back often for more insights, educational videos and responses to questions. If you would like to learn more about where you can snowmobile in Colorado, please visit our Colorado Map.


How to get a snowmobile unstuck

Guided and Unguided Snowmobile and Timbersled Rentals

Timbersled Snow Bike Rentals

Our Timbersled Snow Bike rentals are ideal for intermediate riders of dirt bikes and can handle any terrain and any condition. Our adult Timbersled Snow Bikes are built using a KTM 450 SXF Body and we also offer the Timbersled ST Ripper for kids who want to ride. Learn more about Timbersled Snow Bike Rentals

Snowmobile Rentals

We offer a variety of Trail Sleds for backcountry touring and High-performance Powder Sleds for big mountain riding from Polaris Industries including the Polaris Pro RMK850 Patriot. Each machine is professionally maintained by our Polaris certified mechanics. Learn more about Snowmobile Rentals